We’re talking about the core elements here:
PRPs (Prerequisite Programs)
OPRPs (Operational Prerequisite Programs)
CCPs (Critical Control Points)
These are the pillars that hold up your entire food safety system.
Verification is what keeps them from quietly failing without anyone noticing.
Verification in the Plan-Do-Check-Act (PDCA) Cycle
ISO 22000 is built around the Plan-Do-Check-Act (PDCA) cycle—that’s the framework holding everything together. Now, guess where verification fits in?
Right in the “Check” phase.
This is the moment where you pause and ask:
“Okay, we made a plan. We followed it. But… is it actually working?”
Verification is your way of checking in on your system’s performance. It's not just about ticking boxes—it’s about asking honest questions and looking at the evidence.
Is the process doing what we expected?
Are our control points really controlling hazards?
Are the temperatures, tests, and cleaning schedules actually effective?
If the answer is “yes,” great! If not—well, that’s where the “Act” part of PDCA kicks in. You make adjustments, improvements, or corrections to get things back on track.
And here’s the twist:
You don’t just place verification inside the PDCA cycle—you actually need to use the PDCA cycle to carry out verification activities.
Confusing? Yeah, it threw me off too at first.
But let me break it down for you in a simple table so it actually makes sense:
Stage | What It Looks Like in Verification |
Plan | Define verification methods and criteria Decide what to verify, how you'll do it, when, and who is responsible. (e.g., “We’ll verify freezer temperatures weekly using calibrated thermometers.”) |
Do | Implement processes and controls. Carry out the verification activity as planned. That means taking measurements, reviewing records, conducting internal audits, etc. |
Check | Verify if controls are effective using audits, tests, reviews. Analyze the results. Are the control measures effective? Is there anything out of spec? Did the thermometer read what it was supposed to? |
Act | Take corrective action if verification reveals problems. If something’s off, take corrective action. Maybe the thermometer needs recalibration. Maybe staff need retraining. Maybe your control point needs tweaking. Whatever it is, this is where you fix it.
|
Let’s talk a bit more about planning a verification activity—because that’s really where it all begins.
Like we just saw in the “Plan” phase of PDCA, verification doesn’t just happen randomly. ISO 22000:2018 is very clear on this: if you’re going to verify something, you need a plan. And that plan should answer a few key questions:
What’s the purpose?
What exactly are you trying to confirm? Maybe it’s whether your temperature control is working, or whether sanitation procedures are actually reducing contamination risk.
Are you reviewing records? Using a calibrated thermometer? Running a lab test? Internal audit?
Is this a daily check? Weekly? Monthly? Some verifications are done every shift, while others might only need to happen once a year.
Someone has to own the task. Is it the quality assurance team? The production supervisor? The food safety lead?
What methods or tools will you use?
How often will you do it?
Who’s responsible?
If you can’t answer these four questions clearly, then chances are your verification activity isn’t fully planned—and that means it’s probably not reliable either.
So before jumping into any checks or reviews, start by getting your verification plan on paper. That way, you’re not just doing it because “we’re supposed to”—you’re doing it with purpose and clarity.
Types of Verification Activities
Now that we know how to plan verification activities, let’s quickly look at the different types of verification you might come across:. Verification can be categorized into the following:
Type | Purpose | Examples |
Process verification | Ensures control measures are applied as planned | Review of OPRP/CCP monitoring records, verification of measuring equipment |
Product verification | Assures product meets safety requirements | Microbiological testing of finished goods |
System verification | Evaluates overall FSMS performance | Internal audits, management review |
HACCP plan verification | Validates HACCP principles are correctly applied | Periodic plan reviews, external audits |
Real-Life Example: Process Verification in a Storage Warehouse
For the purpose of this article will shall delve into process verification choosing one PRP typical of a food storage warehouse and dwelling on that as our example for this critical step
Let’s focus on a PRP example from a food storage warehouse—specifically the receiving stage.
Scenario: Frozen Goods at Receiving
You've implemented a control measure that states:
“All frozen products must be received at a temperature of ≤ –15°C.”
How do you monitor this?
So far, so good. But how do you verify that your monitoring process is actually reliable? In this case, your main monitoring tool is the probe thermometer. Your verification step is to confirm that the thermometer is functioning correctly and providing accurate readings.
Let’s call this PRP 1 — and here’s how you verify it:
Verification Activities:
Annual calibration by a certified or regulatory service provider
Daily calibration using the ice-point method
Let’s expand on the second point, since it’s something every food safety team should master.
How to Perform a Daily Ice-Point Calibration
Before any temperature measurements are taken for the day, the thermometer should be verified using the ice-point method:
Fill a cup with crushed ice and a small amount of water.
Insert the thermometer probe into the center of the mix—don’t let it touch the sides or bottom.
Wait for the temperature to stabilize. It should read 0°C.
If the reading is off by more than ±0.4°C, flag the thermometer for recalibration or replacement.
This simple test helps catch issues early and prevents faulty readings from undermining your entire safety system.
Real-Life Example: Process Verification in a Storage Warehouse
For the purpose of this article will shall delve into process verification choosing one PRP typical of a food storage warehouse and dwelling on that as our example for this critical step
Let’s focus on a PRP example from a food storage warehouse—specifically the receiving stage.
Scenario: Frozen Goods at Receiving
You've implemented a control measure that states:
“All frozen products must be received at a temperature of ≤ –15°C.”
How do you monitor this?
So far, so good. But how do you verify that your monitoring process is actually reliable? In this case, your main monitoring tool is the probe thermometer. Your verification step is to confirm that the thermometer is functioning correctly and providing accurate readings.
Let’s call this PRP 1 — and here’s how you verify it:
🔧 Verification Activities:
Annual calibration by a certified or regulatory service provider
Daily calibration using the ice-point method
Let’s expand on the second point, since it’s something every food safety team should master.
How to Perform a Daily Ice-Point Calibration
Before any temperature measurements are taken for the day, the thermometer should be verified using the ice-point method:
Fill a cup with crushed ice and a small amount of water.
Insert the thermometer probe into the center of the mix—don’t let it touch the sides or bottom.
Wait for the temperature to stabilize. It should read 0°C.
If the reading is off by more than ±0.5°C, flag the thermometer for recalibration or replacement.
This simple test helps catch issues early and prevents faulty readings from undermining your entire safety system.
Verification Activities for This Stage Might Include:
Activity | Purpose | Frequency | Responsible |
Daily ice point check of the probe thermometer | Verifies that the thermometer gives accurate readings | Daily | Receiving supervisor |
Annual calibration by certified provider | Ensures long-term accuracy of thermometers (probe & fixed) | Annually | QA team |
Review of temperature logs and receiving forms | Confirms monitoring was done and within limits | Weekly | QA team |
Cross-check truck thermograph data (if available) | Additional verification of delivery temperature | Periodic spot-checks | QA team |
Objective Evidence in Verification
To meet ISO 22000:2018 requirements, verification must be documented. Objective evidence may include:
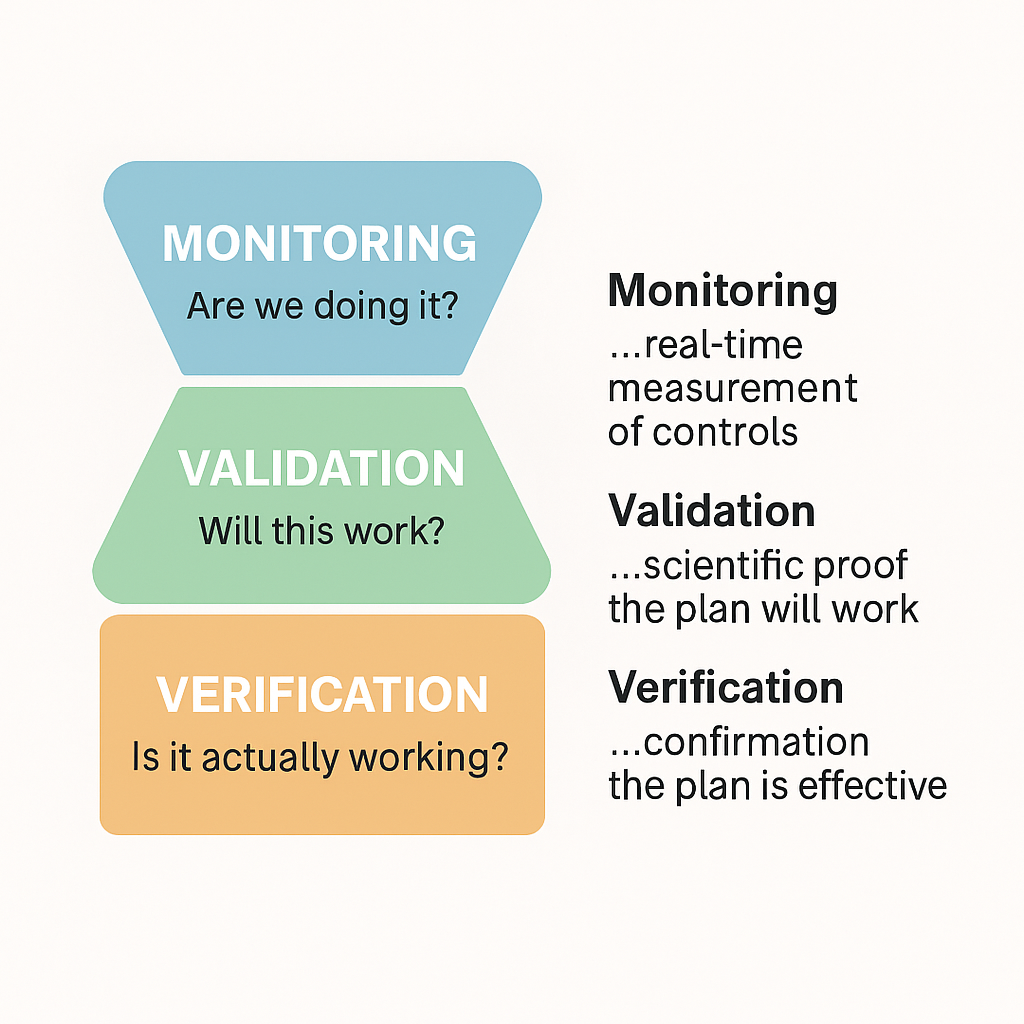
Verification vs Monitoring vs Verification
There is no better way to present this rather than simply putting in a tabular form
Concept | Focus | Timing | Example |
Monitoring | Real-time measurement of controls | Continuous | Logging fridge temperature during storage |
Validation | Scientific proof control measures work | Before implementation | Proving time/temperature kills pathogens |
Verification | Confirming the system is effective | Periodic | Auditing CCP records, testing final products, calibration of measurement equipment…etc |
To add more context to this, here is another summary
Final Thoughts
From experience, this is one of the activities that many food safety personnel tend to overlook or underestimate, yet it is just as critical as performing hazard analysis or defining critical control points (CCPs) in HACCP.
Without verification, there is no objective way to confirm that control measures are effective.
Verification is not a one-off task—it's a continual process that supports the integrity of the entire Food Safety Management System. It’s your proof of performance.
Failing to implement robust verification may result in:
Unnoticed system failures
Unsafe products reaching customers
Non-compliance with ISO 22000 or regulatory requirements
On the other hand, a well-structured verification system builds confidence, traceability, and audit-readiness.
To learn more about HACCP set up for a food storage warehouse, click here: HACCP
.png)

Comments
Post a Comment